Technical questions
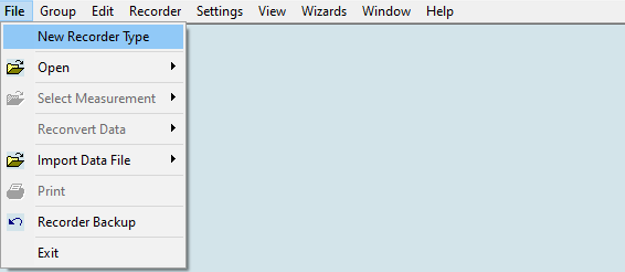
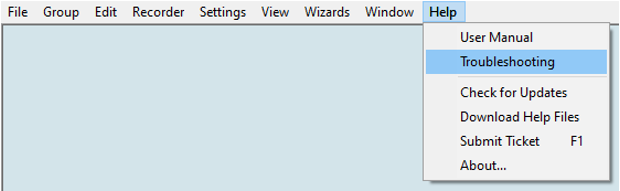
If you cannot find the information you are looking for on this page, please look at the troubleshooter document in your application software you are using (SeaStar, Mercury or Foodstar). In the software, select the correct logger type 'File > New Recorder Type' and find the document under 'Help > Troubleshooting'. Or you can download the troubleshooters here. You can also contact us with any questions.
DST loggers
I cannot connect to the DST logger. What could be the issue?
To be able to communicate with the logger, the three lights on the communication box need to be lit.
Red light (POWER) – This light indicates if power is fed to the Com Box through the USB cable. Older boxes use a power supply. If the light is absent, then there is an issue with the USB cable or power supply.
Solutions:
- Connection of cable: Check the cable, whether it is properly connected.
Yellow light (PC COM) – With the box connected to a computer, this light should illuminate when choosing ‘Wizards > Connection Wizard’ in the software. If this light does not appear then the USB driver might not be installed. It should automatically be installed when you connect the Com Box to the PC, but this may not always be the case. Try to manually install the driver from our website.
Solutions:
- USB driver: Manually install the USB driver from our website.
- The use of the software:
- Use Wizard to connect to the logger: 'Wizards > Connection Wizard'.
- Use Wizard to connect to the Com Box: 'Wizards > ComBox Connection'.
- Choose the relevant logger type: 'File > New Recorder Type'.
- Wrong type of USB converter cable: Older Com Boxes with RS232 9 pin plug should be used with the CHIPI-X serial converter cable (blue and white coloured). Please contact us if that is the case.
- Software update: Check for updates manually under 'Help > Check for updates' although the software should prompt for updates automatically, providing that the PC is connected to the internet.
Green light (DST COM) – With a DST logger sitting in the box (curved end first in) this light illuminates after choosing ‘Wizards > Connection Wizard. If only red and yellow lights are on, the problem is either a logger failure or the Com Box has an internal damage.
Solutions:
- Logger inserted incorrectly: Check if the logger is inserted correctly into the hole in the box. The curved end should face down (for a DST with epoxy filling then that end faces up).
- Another logger that works: If you have another DST try insert it in the box to see if the green light appears and if the connection is successful. If successful, then the DST with no green light has malfunctioned. In this case contact us, include the serial no. and if a data retrieval attempt is wanted.
- Com Box upgrade/repair: If the green light does not appear for any logger, the problem is most likely with the Com Box and needs repair. The problem can also be due to a very old Com Box being used that is not compatible with new loggers. Please contact us, include the serial no. of the Com Box and the DST for us to verify compatibility.
If none of the above solutions solves the problem and the only missing Com Box light is the green one, the problem is likely with the logger. Please contact us.
The software reports 'Power down fault' or 'POR'. What does it mean?
POR stands for Power On Reset. That happens when the microprocessor in the logger detects a power drop or shortage in current. Usually, this error is permanent and relates to low or no energy remaining in the batteries or unstable battery connection due to internal damage or leakage.
Using the logger when the software reports 'Power down fault' or 'POR' is not recommended. If you require additional information, please contact us.
Is it possible to charge or exchange batteries in DST loggers?
The DST loggers are hermetically sealed and waterproof. Once the seal is broken the DST loggers become unusable. Hence, it is not possible to recharge or replace the internal batteries.
How long will the battery and memory of my logger last?
In the application software you can get an estimate of how long the battery and memory last based on your intended measurement interval(s).
You can get the memory and battery life estimate in the following way:
- Open the software: SeaStar, Mercury or FoodStar.
- Select the correct logger type: 'File > New Recorder Type'
- Choose one of the following methods:
- Assuming full battery (100%): Continue without connecting to the logger or opening a previous logger folder. Then the calculations are based on a logger with a full battery (100%).
- Current battery status: Connect to the logger through 'Wizards > Connection Wizard' or 'Recorder > Connect'. This method uses the logger’s current battery status.
- Estimated battery status from previous measurement: If you don’t have the logger with you but want to estimate its battery status based on previous usage, open the latest measurement file under 'File > Open'. Select data from the dropdown list or browse for the RID file corresponding to the chosen logger, followed by the MID file for the latest measurement sequence (experiment). This method uses the battery status at the end of that measurement, plus estimated battery usage during sleep time.
-
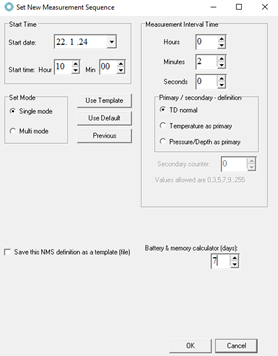
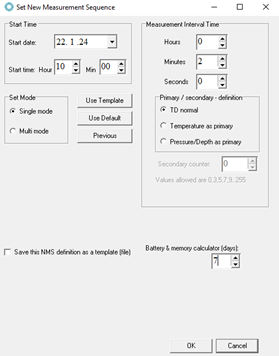
Set up your desired measurement interval (new measurement sequence): 'Edit > New Measurement Seq. Def. ', then enter in the below areas:
- Start time (if known, otherwise it will assume you want to start to measure immediately).
- Measurement interval time: the time between each recorded data point.
- Battery and memory calculator: Use this option if you want to get an estimate of battery and memory usage over a selected period, for example, a day or a week.
-
Review the results:
Once you have completed the setup and pushed ‘OK’, a new measurement sequence (NMS) file opens. It includes calculations for battery and memory usage based on your setup.
Below are examples of calculations.
- Red boxes: These calculations show how long the logger will measure if kept in measurement mode until the battery runs out or the memory is full, whichever happens first.
- Blue boxes: If the 'Battery and memory calculator (days)' option was used, you can also find how much battery and memory is used for a selected period. Those findings are shown within the blue boxes.
You will get either of the two windows, depending on whether the battery runs out first or if the memory was full.
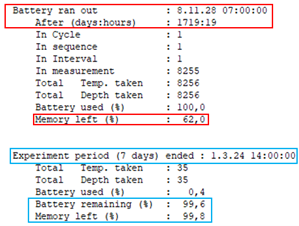
- Battery runs out first
Red box: Example showing in how many days or hours the battery will run out and how much memory (%) is remaining at that time.
Blue box: Example showing how much battery and memory was used in the selected period.

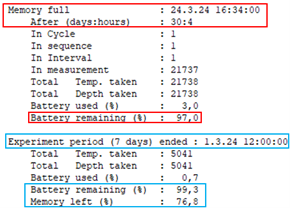
- Memory fills first
Red box: Example showing in how many days and hours the memory fills and the remaining battery life (%) at that time.
Blue box: Example showing how much battery and memory was used in the selected period.
Can I check if the logger has been started okay?
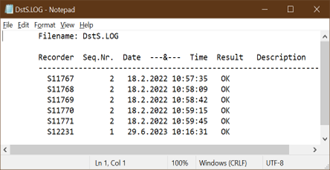
To see if the logger started okay, you can check the log file.
The log file can be found in two ways:
- Under the software directory in the log folder, showing as
- This PC\OS (C:)\Software\Star-Oddi\Mercury\log\*.LOG
- This PC\OS (C:)\Software\Star-Oddi \SeaStar\log\*.LOG
- This PC\OS (C:)\Software\Star-Oddi \FoodStar\log\*.LOG
- In the software, Mercury, SeaStar, or FoodStar. Select the relevant recorder type under 'File > New Recorder Type' and then open the log file under 'View > Log Files > SNMS Log File (LOG) '.

A summary of all the started loggers for that type can be seen in the *.LOG file. If the result is marked OK, the measurement setup worked. If there was an error when starting the logger, the fault description will follow.
A word of warning
After you have started the logger for measurements, do not connect to the logger again via the computer, as it will result in changing the logger from measurement mode to sleep mode, therefore stopping the measurements. Connect only to the logger when you have finished the research and want to retrieve the data.
Can I find out how the logger was programmed after it started to measure data?
Information on the measurement start time, measurement settings, and more can be found in the RDT (Recorder Download Information) file and MDT (Measurement Download Definition) file for each logger.
These files can be found in two ways:
- Under the software directory in the logger folder located at
- This PC\OS (C:)\Software\Star-Oddi\Mercury\'Logger type'\'Serial number of the logger'
- This PC\OS (C:)\Software\Star-Oddi\SeaStar\'Logger type'\'Serial number of the logger'
- This PC\OS (C:)\Software\Star-Oddi\FoodStar\'Logger type'\'Serial number of the logger'
Here is an example. The location of the RDT file for a DST CTD logger with the serial number S11767 that uses the SeaStar software would be:
This PC\OS (C:)\Software\Star-Oddi \SeaStar\DST CTD\S11767\S11767.RDT
- In the software, Mercury, SeaStar, or FoodStar.
- After starting a new measurement sequence, the RDT file is displayed in the software.
- You can also manually open it by selecting the relevant recorder type under 'File > New Recorder Type' and then opening the logger folder under 'File > Open'.
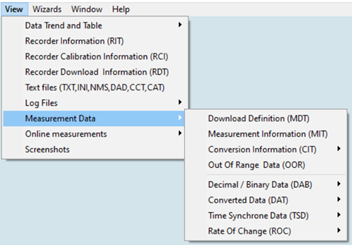
- After opening the folder for a certain logger, you can view its RDT file under 'View > Recorder Download Information (RDT)' and its MDT file under 'View > Measurement Data > Download Definition (MDT)'.
I have communication issues with my HRT/ACT logger. What could be the issue?
As of June 2022, there has been a communication issue that sometimes affects HRT and ACT loggers. In cases where communication is poor or impossible, we have implemented a workaround solution which changes the so-called baud rate (symbol rate: Bd) during the wireless communication from the logger (DST) to the communication box.
- Ensure Mercury is up to date
Download the latest software version from our website.Or inside Mercury, click Help > Check for Updates - Attempt to connect to the logger
Use the wizard or direct connection as you normally would.If a communication error appears (for example, “Wrong Data Check the hardware connection”, “Wrong command echo, Check the recorder or type def” or “The CRC test and 2xRID compare failed! Please try again”), proceed to next step. -
Adjust the Baud Trim
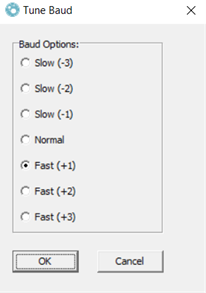
In this step you adjust the Baud trim to find the option that allows communication with the logger.
Select Settings > Communication > Baud Trim and select Fast (+1) and Press OK.
- Attempt to connect to the logger, with adjusted Baud Trim
Press Recorder > Connect and try retrieving the data or programming the logger depending on what the task at hand is.
Make sure the correct COM port is selected through Settings > Communication > Serial Ports and that all three lights on the communication box are lit (red, green and yellow). - Try other Baud Trim options if needed
Repeat steps 3 and 4 until a connection is made. Adjust the Baud Trim in the following order: +1, -1, +2, -2, +3, -3. You can only select one Baud Trim option at a time.
You need to select the setting and press OK, then try to connect/program the logger before trying the next setup.
Note: Each time you close the Mercury software or change the logger type, the Baud Trim settings will be reset to “Normal”. - Further clarifications on the Baud rate
Normal baud rate for HRT and ACT is 4800 Bd, by changing +/-1 you increase or decrease the baud rate by 100 Bd.
When you have found a specific Baud Trim setting works with one logger, you can start by trying that setting with the other loggers you are attempting to connect to.
What does the name of the logger files stand for?
If you are locating your data files in the software after your research it is good to know how the data file name is derived. That way you can locate it more easily.
The data file name consists of two parts:
- The measurement number, which is a rolling number based on how many sequences (experiments) have been run.
- The logger ID, which includes a letter(s) depending on the type of logger, and a serial number which is the production number of the logger.
An example of a data file name is 1U17000. It is a DST micro-T logger with the serial number U17000. The first measurement will have sequence number 1 in front of the serial number (1U17000), the second measurement sequence (second experiment) will have number 2 in front of the serial number (2U17000) and so on.
The letter(s) associated with each logger type:
|
|
I cannot find my logger files. Where could they be?
Placing the Mercury, SeaStar or FoodStar folder in Program Files(x86) or Program Files can cause issues with file storage. This happens only when you do not have administrator privileges to your computer.
If you are not running the software as an administrator, the software appears to function normally, and data seems to be stored correctly under the Mercury, SeaStar or FoodStar folder. However, when you try to access your data through File Explorer after the logger data has been stored, the files are not where you expected them to be.
This happens because Windows redirects the files to a “Virtual Store”, making it seem like they are stored normally while Windows actually places them elsewhere.
An example of missing files:
The software was placed in: Program Files(x86)\”Software”\
If the software was not run with administrator privileges, all logger data was redirected to:
C:\Users\“Username”\AppData\Local\VirtualStore\Program Files (x86)\“Software”\
Your data should be found in this folder structure under the respective software folder in Mercury, SeaStar, or FoodStar.
How to fix this:
To prevent this issue, move the entire Mercury, SeaStar or FoodStar folder, including the logger files and the software, from the Virtual Store to another location, or reinstall the software to another folder.
Please note that if you later run the software with administrator privileges, data from previous non-administrator runs are still in the “Virtual Store”.
Can I adjust depth/pressure readings from a previous measurement?
You can improve the accuracy of a logger’s pressure recordings by finding the offset value, which is the difference between a logger’s pressure reading and a reference meter’s pressure value.
Methods to find the offset value
- In-air value: This is a quick and simple check. Use in-air measurements by logging data for a few minutes on your desk. The retrieved data will either be shown as negative or positive values and shows the offset. The average in-air value should be used for the pressure sensor offset correction. In-air measurements should be as close to a zero value (0 meters/bar) as possible. Note that high pressure sensors, more than 800 meters, will give more accurate results using the methods below.
- Reference depth/pressure meter: Place the logger alongside an accurate reference depth/pressure meter if you have one, preferably at a depth of more than 2 meters (0.2 bar pressure). Measure for a few minutes and compare to the reference point.
- Known depth: Place the logger at a known depth, preferably greater than 2 meters, measure for few minutes, and then you will see the offset.
This offset can be used to correct previous data but it can also be downloaded into the logger for future measurements. The following steps outline how to correct previous data.
Reconvert older data with offset adjustments
- Find an offset value: Select one of the methods above (a, b or c) to find the offset value.
- Open the data: First, choose the recorder type under 'File > New Recorder Type', and select the relevant type. Then open the data under 'File > Open'. Select data from the dropdown list or browse for the RID file corresponding to the chosen logger, followed by the MID file for the latest measurement sequence (experiment).
-
Select one of two adjustment methods:
First, navigate to 'Edit > Reconvert Definition > Pressure Definition'.
Note, when using 9.81 as g, the coefficient for converting cm into mbar is 1.019 (100 cm = 101.9 mbar).

Method 1: If the offset remains constant throughout the measurement sequence- Pressure offset adjustment: Enable the 'Offset adjustment value (mbar)'. Enter the offset value and select 'Add the value' if the surface measurement is negative, or 'Subtract the value' if positive.
Method 2: If there is a linear drift throughout the measurement sequence
If there is no offset at the beginning of the measurement sequence, you can skip the pressure offset adjustment and go straight to the linear adjustment.
- Pressure offset adjustment: Enable the 'Offset adjustment value (mbar)'. Enter the offset value from the beginning of the measurement. Select 'Add the value' if the surface measurement is negative or 'Subtract the value' if positive.
- Pressure linear adjustment: Enable the 'Linear adjustment value (mbar)'. Enter the total drift from the beginning to the end of the measurement. Fill in the measurement duration under ‘Time span (days)’. The offset will then be adjusted linearly over this period.
Select 'Positive slope correction' if the surface measurements show negative depth values at the end of the deployment. - Reconvert the data: Once all details are filled in, click 'OK'. Then, go to 'File > Reconvert Data > Current' to apply the adjustment to the chosen data.
Note: For additional information on pressure offset and linear adjustment check the User Manual, Section 8.3.2 and 8.3.3.
Can I adjust the depth/pressure offset in my logger for the next deployment?
You can improve the accuracy of pressure recordings by the offset value, which is the difference between a logger’s pressure reading and a reference meter’s pressure value.
Methods to find the offset value:
- In-air value: This is a quick and simple check. Use in-air measurements by logging data for a few minutes on your desk. The retrieved data will either be shown as negative or positive values and shows the offset. The average in-air value should be used for the pressure sensor offset correction. In-air measurements should be as close to a zero value (0 meters/bar) as possible. Note that high pressure sensors, more than 800 meters, will give more accurate results using the methods below.
- Reference depth/pressure meter: Place the logger alongside an accurate reference depth/pressure meter, if you have one, preferably at a depth of more than 2 meters (0.2 bar pressure). Measure for a few minutes and compare to the reference point.
- Known depth: Place the logger at a known depth, preferably greater than 2 meters, measure for few minutes, and then you will see the offset.
This offset can be used to correct previous data, but it can also be downloaded into the logger for future measurements.
The following steps outline how to download the offset into the recorder.
Download pressure offset correction to the logger:
- Find an offset value: Select one of the methods above (a, b or c) to find the offset value.
- Connect to the recorder: If the recorder is not already connected, use 'Wizard > Recorder Wizard' or 'Recorder > Connect', to establish a connection.
-
Set the offset value: Navigate to 'Edit > Reconvert Definition > Pressure Definition' and enable the ‘Offset adjustment value (mbar). When using 9.81 as g, the coefficient for converting cm into mbar is 1.019. (100 cm = 101.9 mbar). Enter the offset value and select ‘Add the value’ if the surface measurement is negative or ‘Subtract the value’ if positive. Enable ‘Make/update an RBD file with offset correction’ and press OK to proceed.

- Create the RBD file: After clicking OK, an RBD file is created with the offset correction value, stored under the software directory in the RBD folder, showing as:
This PC\OS (C:)\Software\Star-Oddi \SeaStar\RBD - Browse for the RBD file: Choose 'File > Recorder Backup' and browse for the RBD file corresponding to the recorder’s serial number. There is no need to modify the ‘Set Sequence Number and Battery Life’ window, as the information should already be correct.
- Download the RBD file: Click OK to transfer the correction to the recorder. The calibration coefficient has now been updated inside the recorder (in the RCI file), ensuring future measurements reflect the applied correction.
Starmon loggers
I cannot connect to the Starmon logger. What could be the issue?
With the supplied USB cable connected between a computer and Starmon, the red light next to the USB port of the Starmon should illuminate and remain steady. This does not apply to the older version of Starmon mini model as it does not have a diode. If there is an issue connecting the following scenarios may apply:
- The red light does not show at all: Then there is an issue with the logger. Please contact us if that is the case.
- The red light appears briefly and then turns off: The computer initially recognizes the logger but only for a short duration. Possible solutions include:
- Software update: Check for updates manually under 'Help > Check for updates' although the software should prompt for updates automatically.
- The use of the software:
- Choose the relevant logger type: 'File > New Recorder Type'
- Use the Wizards menu for establishing connecting: 'Wizards > Connection Wizard'.
- Try connecting to the logger using a different computer, preferably from another computer brand.
- The red light illuminates continuously but connection is impossible: The USB driver might not be installed or requires an update. Instructions for installing the Zadig WinUSB driver can be found at our website.
The software reports 'Power down fault' or 'POR'. What does it mean?
POR stands for Power On Reset. When the microprocessor in the logger detects a power drop or shortage in current, it performs a reset. For non-rechargeable loggers, this error is usually permanent as it is related to low energy remaining in the logger’s battery which needs to be replaced.
To check if the battery is completely empty, you can follow these steps:
- Open the software and connect to the logger. Start a measurement sequence and take a few measurements at your desk.
- If the battery is not empty, the following should occur:
- When the logger is set up to measure, the red light should blink for a couple of seconds.
- Every minute until the measurement starts (or within a maximum of 15 minutes) the red light should blink as well.
- A short test measurement sequence is successfully retrieved.
For non-rechargeable Starmon, it is not recommended to use the logger when the software reports a 'Power down fault' or 'POR', even if some energy remains. The battery can be replaced, please contact us for service or instructions how to change the battery.
For rechargeable Starmon, when the software reports 'Power down fault' or 'POR' and the battery life is low, charging the logger should resolve the issue. However, if the battery life is high, there may be a problem with the battery connection, requiring service. Please contact us if charging the logger does not resolve this problem.
How long will the battery and memory of my logger last?
In the application software you can get an estimate of how long the battery and memory last based on your intended measurement interval(s).
You can get the memory and battery life estimate in the following way:
- Open the SeaStar software.
- Select the correct logger type: 'File > New Recorder Type'
- Choose one of the following methods:
- Assuming full battery (100%): Continue without connecting to the logger or opening a previous logger folder. Then the calculations are based on a logger with a full battery (100%).
- Current battery status: Connect to the logger through 'Wizards > Connection Wizard' or 'Recorder > Connect'. This method uses the logger’s current battery status.
- Estimated battery status from previous measurement: If you don’t have the logger with you but want to estimate its battery status based on previous usage, open the latest measurement file under 'File > Open'. Select data from the dropdown list or browse for the RID file corresponding to the chosen logger, followed by the MID file for the latest measurement sequence (experiment). This method uses the battery status at the end of that measurement, plus estimated battery usage during sleep time.
-
Set up your desired measurement interval (new measurement sequence): 'Edit > New Measurement Seq. Def. ', then enter in the below areas:
- Start time (if known, otherwise it will assume you want to start to measure immediately).
- Measurement interval time: the time between each recorded data point.
- Battery and memory calculator: Use this option if you want to get an estimate of battery and memory usage over a selected period, for example, a day or a week.
-
Review the results:
Once you have completed the setup and pushed 'OK', a new measurement sequence (NMS) file opens. It includes calculations for battery and memory usage based on your setup.
Below are examples of calculations.
- Red boxes: These calculations show how long the logger will measure if kept in measurement mode until the battery runs out or the memory is full, whichever happens first.
- Blue boxes: If the 'Battery and memory calculator (days)' option was used, you can also find how much battery and memory is used for a selected period. Those findings are shown within the blue boxes.
You will get either of the two windows, depending on whether the battery runs out first or if the memory was full.

- Battery runs out first
Red box: Example showing in how many days or hours the battery will run out and how much memory (%) is remaining at that time.
Blue box: Example showing how much battery and memory was used in the selected period.
- Memory fills first
Red box: Example showing in how many days and hours the memory fills and the remaining battery life (%) at that time.
Blue box: Example showing how much battery and memory was used in the selected period.
Can I check if the logger has been started okay?
To see if the logger started okay, you can check the log file.
The log file can be found in two ways:
- Under the software directory in the log folder, showing as
This PC\OS (C:)\Software\Star-Oddi \SeaStar\log\*.LOG - In the SeaStar software. Select the relevant recorder type under 'File > New Recorder Type' and then open the log file under 'View > Log Files > SNMS Log File (LOG) '.

A summary of all the started loggers for that type can be seen in the *.LOG file. If the result is marked OK, the measurement setup worked. If there was an error when starting the logger, the fault description will follow.
A word of warning
After you have started the logger for measurements, do not connect to the logger again via the computer, as it will result in changing the logger from measurement mode to sleep mode, therefore stopping the measurements. Connect only to the logger when you have finished the research and want to retrieve the data.
Can I find out how the logger was programmed after it started to measure data?
Information on the measurement start time, measurement settings, and more can be found in the RDT (Recorder Download Information) file and MDT (Measurement Download Definition) file for each logger.
These files can be found in two ways:
- Under the software directory in the logger folder located at:
This PC\OS (C:)\Software\Star-Oddi\SeaStar\'Logger type'\'Serial number of the logger'
Here is an example. The location of the RDT file for a Starmon TD logger with the serial number D0388 would be:
This PC\OS (C:)\Software\Star-Oddi \SeaStar\Starmon TD\D0388\D0388.RDT
- In the SeaStar software.
- After starting a new measurement sequence, the RDT file is displayed in the software.
- You can also manually open it by selecting the relevant recorder type under 'File > New Recorder Type' and then opening the logger folder under 'File > Open'.
- After opening the folder for a certain logger, you can view its RDT file under 'View > Recorder Download Information (RDT)' and its MDT file under 'View > Measurement Data > Download Definition (MDT)'.
What does the name of the logger files stand for?
If you are locating your data files in the software after your research it is good to know how the data file name is derived. That way you can locate it more easily.
The data file name consists of two parts:
- The measurement number, which is a rolling number based on how many sequences (experiments) have been run.
- The logger ID, which includes a letter(s) depending on the type of logger, and a serial number which is the production number of the logger.
An example of a data file name is 1D0388. It is a Starmon TD logger with the serial number D0388. The first measurement will have sequence number 1 in front of the serial number (1D0388), the second measurement sequence (second experiment) will have number 2 in front of the serial number (2D0388) and so on.
The letter(s) associated with each logger type:
- Starmon mini: T
- Starmon mini USB: LTL
- Starmon TD: D
- Starmon tilt: SXL
- Starmon Compass: SCL
I cannot find my logger files. Where could they be?
Placing the SeaStar folder in Program Files(x86) or Program Files can cause issues with file storage. This happens only when you do not have administrator privileges to your computer.
If you are not running the software as an administrator, the software appears to function normally, and data seems to be stored correctly under the SeaStar folder. However, when you try to access your data through File Explorer after the logger data has been stored, the files are not where you expected them to be.
This happens because Windows redirects the files to a “Virtual Store”, making it seem like they are stored normally while Windows actually places them elsewhere.
An example of missing files:
The software was placed in: Program Files(x86)\”Software”\
If the software was not run with administrator privileges, all logger data was redirected to:
C:\Users\“Username”\AppData\Local\VirtualStore\Program Files (x86)\SeaStar\
Your data should be found in this folder structure under the respective software folder in SeaStar.
How to fix this:
To prevent this issue, move the entire SeaStar folder, including the logger files and the software, from the Virtual Store to another location, or reinstall the software to another folder.
Please note that if you later run the software with administrator privileges, data from previous non-administrator runs are still in the “Virtual Store”.
Is it possible to charge or replace battery in Starmon loggers?
The batteries of all our Starmon loggers can be replaced, but only some types of Starmon loggers can be charged. Starmon Tilt and Starmon Compass are the two models that are manufactured with a rechargeable battery (Tilt from Nov 2022, Compass from Jan 2023). For those models, battery replacement is typically not needed unless there are issues such as an unstable battery connection or a dead battery.
For battery replacement, please contact us for instructions and specs for the battery type, or if wanting a price quote for that service.
Software
I am missing the software product key. Where can I find it?
A product key is required to run the application software you have downloaded. The product key is delivered with the purchase of the software and can be found in the cover of the Quick start guide booklet. The Application software is a one-time purchase with all upgrades free of charge. If you cannot find the product key, please contact us.
How do I save the data in Excel format?
Open SeaStar, Mercury or FoodStar.
- Choose the logger type:File > New Recorder Type
- Choose the logger data:File > Open > Browse or choose from list.Or File > Import Data File > Browse or choose from list.
- Save the data as an xlsx or CSV file by clicking the marked buttons on the toolbar. (CSV file is recommended).
.")
What does the name of the logger files stand for?
If you are locating your data files in the software after your research it is good to know how the data file name is derived. That way you can locate it more easily.
The data file name consists of two parts:
- The measurement number, which is a rolling number based on how many sequences (experiments) have been run.
- The logger ID, which includes a letter(s) depending on the type of logger, and a serial number which is the production number of the logger.
An example of a data file name is 1U17000. It is a DST micro-T logger with the serial number U17000. The first measurement will have sequence number 1 in front of the serial number (1U17000), the second measurement sequence (second experiment) will have number 2 in front of the serial number (2U17000) and so on.
The letter(s) associated with each logger type:
|
|
I cannot find my logger files. Where could they be?
Placing the Mercury, SeaStar or FoodStar folder in Program Files(x86) or Program Files can cause issues with file storage. This happens only when you do not have administrator privileges to your computer.
If you are not running the software as an administrator, the software appears to function normally, and data seems to be stored correctly under the Mercury, SeaStar or FoodStar folder. However, when you try to access your data through File Explorer after the logger data has been stored, the files are not where you expected them to be.
This happens because Windows redirects the files to a “Virtual Store”, making it seem like they are stored normally while Windows actually places them elsewhere.
An example of missing files:
The software was placed in: Program Files(x86)\”Software”\
If the software was not run with administrator privileges, all logger data was redirected to:
C:\Users\“Username”\AppData\Local\VirtualStore\Program Files (x86)\“Software”\
Your data should be found in this folder structure under the respective software folder in Mercury, SeaStar, or FoodStar.
How to fix this:
To prevent this issue, move the entire Mercury, SeaStar or FoodStar folder, including the logger files and the software, from the Virtual Store to another location, or reinstall the software to another folder.
Please note that if you later run the software with administrator privileges, data from previous non-administrator runs are still in the “Virtual Store”.